Friday 9 November 2012

Pond Friends Stacking toy

I came across this cute developmental toy on Lion Brand yarn website and loved it.
I made it with acrylic dk yarn and a 3.5mm crochet hook. I stuffed the animal with nylon wool and then made the eyes on the frog slightly bigger. I also added a few warts on his face.
Mia is still a bit young to play with this toy yet, but she loves it nevertheless.

Thursday 18 October 2012

Max's Hexagon Blanket

My friend was pregnant and I promised that I'll make something for her new baby. She found out the gender and already had a name picked.
I came across this blanket pattern in Crochet for Babies and Toddlers by Betty Barnden and I really liked it.
Originally I was going to go for the same colours as in the book, but my friend had a neutral moses basket and asked for a blanket that can go into it, so I went for cream and grey yarn, merino wool in dk, 300g in grey and 100g in cream.
I was sewing the hexagons together as I was making them, the pattern is very easy and there are also diagrams that show how to sew them together.

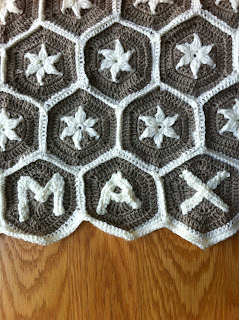
In the last row I left 3 hexagons blank and made letters "M", "A" and "X" which I then sewed on the shapes, making the blanket more personal and unique.

The blanket was ready just in time for my friend's babies arrival.

Tuesday 16 October 2012

Pumpkin hat

I was inspired to make a pumpkin hat for Mia's first Halloween when we received a gift of a little outfit that had a pumpkin on it.

I browsed many designs on different websites until I came across the nicest of all of them.
I started with a stalk that I made out of green merino wool in dk. I first started by making a chain of ten, then I sc into each chain until I had six rows. I then folded the piece so the lower edge was meeting a top edge and sc through both thicknesses making it into a tube. I then made rounds around the end of the tube until I had a proper stalk.
I switched colours and made 10 dc rows in orange dk increasing evenly as I progressed. The ridges were made with front post double crochet. I made the edging with five dtr into the base of the ridge with a chain between them into a base chain, skipped three chains, single crochet, skipped three more chains and made another 5 dtr until the end, fastened off.
I added a final touch by making a little swirly leaf that I attached it to the stalk. I made a chain of 30 and then I made five dc into each chain starting from the second chain from the hook.

The hat is made and now we just have to wait for the Halloween.

Baby Mobile


The next item that I made for my little one was a baby mobile. The idea again came from Natural Crochet for babies and toddles by Tina Barrett. I didn't really like the toys that were in that book, so I decided to come up with my own design. I decided to make some summer bugs and flowers, something very simple but cute.
I wanted to make 5 different toys: a bee, a ladybird, a butterfly, a flower and a sun. For all the designs I googled the images on the Internet and when I found the cutiest ones I tried to create them myself. I used the leftover treads that I had from previous projects for the toys. I also inherited some wool when my friend was moving to another country and she left it with me. The bright warm colours were ideal for making toys.

I stuffed all the toys with nylon wool, glued on plastic eyes and attached them to a chain that I made in yellow colour. My husband made a ring out of a metal coat hanger that I then wound pink wool around. I finished it up with a cute flower and attached all the toys to it.
I bought a second hand mobile arm to hang it above her cot.
My husband also bought a little wind-up device that rotates the mobile while playing the tune "Somewhere over the rainbow".
Mia enjoyed it so much and she loved looking at the spinning toys.


Monday 15 October 2012

Noah's Ark Blanket

I came across this blanket on Ravelry and loved the idea. You can find the pattern on Ravelry, original design by Michele Wilcox, published in Crochet Magazine, May 2008. I already knew how to do the ripple pattern, so I made a blanket measuring 50x50 cm using dk acrylic. I then made the animals and sewed them onto the blanket.
In the original version there was no lion or octopus, but there were a few blankets on Ravelry that had them and I thought it was a brilliant idea.
I started with the blue sea (about 20cm high) and white sky (about 30cm high), the animals and the ark were made with some leftover wool, I then sewed them all together.
It took me about two weeks to complete the blanket, I was making it in my last stages of pregnancy after coming home from a long day in work.
But finally it was finished and ready for my babies arrival.

Friday 15 June 2012

Mia's little toy book

Now that my little girl is 6 months old, she likes playing with fabric toys and books. This gave me an idea to make her a little toy book. I started by making 4 rectangular sheets of single crochet stitches. I used some leftover wool that I had left from other projects. I made them 30 cm wide and 15 cm long in different bright colours.

I then made different animals and picture appliqués. There are lots of inspirations on the internet for these. I used a pattern from Baby Blueprint Crochet by Robyn Chachula for the appliqué of a little dinosaur and Crochet for babies and toddlers by Betty Barnden for a little tractor pattern. I came up with a pattern for a littel yellow duck myself and used images on the internet for the others.
I sewed them onto each half of the sheets, so that when I fold the sheet in half the two different pictures would be on different sides. I then sewed together two different sheets, putting some crinkly plastic in between them. Once the pages were ready I stitched them together along the middle. I made a strawberry appliqué for the front cover of the book and embroidered Mia's name below it. I also made two strings for the front and back pages so the book can be closed.
Mia loves her little book and plays with it a lot and it makes it more special that it is personalised with her name.


Mia's Christening Shawl

I have made a shawl for Mia's Christening using the Tiramisu Blanket pattern again.
This time I made it slightly bigger than the other Tiramisu blanket, used white 300g of DK baby wool and I made the middle part in the same pattern as in the previous blanket.
For the edging I started with a row of single crochet to smoothen up the edging and to make it all even. I then made a row of dtr (double treble stitches, done by wrapping yarn around a hook twice), followed by another row of single crochet and another row of dtr.
I then started with five dtr with a chain between them into a base chain, skipped three chains, single crochet, skipped three more chains and made another 5 drt, repeating until the end. This was followed with a row of single crochet with three chains at every gap between dtr of the previous row.
I finished up the shawl with a white satin ribbon that was weaved through the spaces in the second row of dtr.

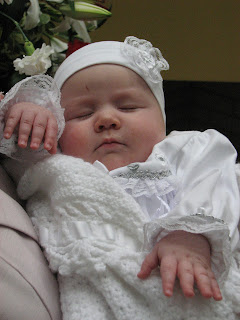
Mia had her Christening a couple of months ago and wore her special little shawl on that day.
Our little angel got so tired that she fell asleep while we were taking photos.

Thursday 26 April 2012

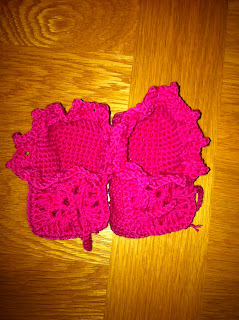
Baby booties

Even before I became pregnant I used to make baby booties for all my friends who were expecting babies. It became my thing and any time a friend or colleague at work got pregnant or had a baby, I would present them with a pair of baby booties in bright colours.
I searched for various patterns but none of them were as straight forward as I wanted. Eventually I came up with my own pattern. The idea is very simple. I make sole and top parts separately and then join them together with a number of single crochet rows which become the sides of the booties.

The yarn I use is mostly merino wool dk, 4 ply or baby yarn. I use a 2.5mm or 3mm hook to make the newborn sizes and a 3.5mm hook for the bigger size of booties.
First make 11 chains, then make 10 single crochet (sc) stitches starting from the second chain from hook.
Make 20 rows of  sc, fasten off and the sole is done.
Then either make 10 rows of sc for the instep part of a shoe or make a more complicated square which will measure half the length of the sole.
Now with either contrast yarn or the same colour make 7 rows of sc around the sole part of a shoe starting from the side of the sole. The results in raised borders which later become the sides of the booties. Attach the instep part with a row of sc in the same colour as the sides of the shoe. Continue working with the same tread to make a cuff around the ankle. Make 3 double crochet stitches (dc) in the first chain of the side of a shoe, then make 3 chains. Put a slip stitch into the top of the last dc, 3 dc into the same chain as the first 3 dc, skip 3 chains and then repeat across the side of a shoe until you reach the end. Fasten off.
To finish up make a chain 15-20 cm long to insert into the holes in the cuff for the booties not to fall from feet. Alternatively you can use some silk ribbons or just make some shoe lace yourself.
You can also decorate the instep with some flowers, funny faces, etc.




Friday 20 April 2012

Tiramisu Baby Blanket


After completing the pink blanket, I decided to make another blanket which would be more neutral. I came across a Tiramisu Baby Blanket pattern by Alicia Paulson on the Ravelty website. The pattern is very simple, but it makes such a lovely texture when crocheted and it looks lovely when viewed from either side.
I choose yellow and white acrylic yarn. It was sold as DK baby wool in a yarn shop. 250g in yellow and 50g in white, I also bought 5m of a yellow satin ribbon 2cm wide to go around the edge of the blanket. Again I used a 3.5mm hook.
The size of my complete blanket was 75x75cm (30x30in)
The pattern instructions can be found on the Ravelty's website.
I would recommend this pattern for any crochet beginner.
You can make the entire blanket out of a single colour, and use a contrast ribbon to go around the edges. Alternatively you can do the same thing I did, by using one colour for the middle part, a different colour for the lace edges and a ribbon which is the same colour as the yarn is the middle part.
This blanket is perfect in the bedroom and I use it to cover Mia in bed on cold nights.

Wednesday 11 April 2012

Second item made - Baby Dungarees


So now after I made a pink blanket I decided to make something for a baby boy, so at least I would be covered if I had either.
A friend of mine gave me a book by Tina Barrett, Natural Crochet for babies and toddlers and I really liked the Cotton Archie Bear Romper Suit. I got 200g of Sirdar Snuggly BabyBamboo yarn in grey and 50g of  Sirdar Snuggly BabyBamboo yarn in blue. The reason why I reversed the colours was that I wanted to make it more neutral. I used my favourite 3.5mm Clover hook.
I didn't want to follow the design from the book completely, as I didn't like the idea of buttons on the back. I knew that my baby would spent most of her time on her back and buttons might hurt her. Instead I decided to make it into dungarees.
I followed the pattern instructions for 0-6 months size. For the front body I followed the instructions as per the original design. For the back body I contuniued crocheting upwards after finishing the bear's face and finished up with two 3cm-wide straps on each side.
I then sewed the two parts together.
I contured with a row of single crochet stitches in blue, followed by grey, making a nice edging on both the legs and the upper body.
I would recommend putting some fasteners on the inside leg for easy access when changing nappies.

Tuesday 10 April 2012

Mia's first blanket

This was the first thing that I created for my baby. My husband and I didn't find out the sex of our baby in advance, so I never knew what kind of blanket to make. But when I saw this blanket in The Happy Hooker book (Seija Stroller Blanket by Bev Ireland), I fell in love with it and wanted to make it. The pattern was very easy and since I hadn't been crocheting for a while beforehand this was a perfect opportunity to start on something so simple and yet so cute. I was planning to give the blanket to my friend who had a little girl only couple of months before me if I had a baby boy.
For the blanket I used 100g Debbie Bliss Baby Cashmerino in pink, 100g Debbie Bliss Baby Cashmerino in chocolate brown and 100g Debbie Bliss Baby Cashmerino in white and a 3.5 mm crochet hook.
The finished size of the blanket was given in inches and since I came from a country using the metric system, I never knew what it meant. I used a measuring tape that had centimetres on one side and inches on the other and started to crochet. I suddenly realised that my blanket was going to be a lot smaller than I expected. It turned out that my measuring tape had incorrect measures for inches, luckily I had an iPhone Units Converter app, so I used the inches and converted them into centimetres and continued my work on the blanket. I must admit I hardly ever follow the instructions for the patterns once I can understand them.
I ended up using all my yarn for the blanket and had nothing left for the braids that are weaved through the spaces in the borders on each end of the blanket. So I finished it up with three rows of single crochet stitches in pink yarn making a nice simple boarder.
So when my baby girl was born, I asked my husband to bring this blanket from home and it was the first thing that she had that was made by me.


Books and websites I use for my projects

I find www.ravelry.com a great source of inspiration. I'm amazed on how people can create the things on this website. Some of the projects can be so complex that it is hard to believe that they were handmade by someone. You will need to register on the website and then you can access all of the patterns and projects published there. Some of the patters can be bought, others are completely free.
I also use the Russian crafts site www.rukodelka.ru to download some of the patterns and crochet magazines.
Another great source for my projects is Lion Brand yarn website (www.lionbrand.com). I use this site's free app on my iPhone. That way I can always access it on my phone and use it anytime.
And finally here is a list of books that I own, most of them are purchased on Amazon, others in bookshops. I also have couple of books that I borrowed from my friend which I also use for some of my projects.
1. Baby Blueprint Crochet by Robym Chachula
2. Crochet for Babies and Toddlers by Betty Barnden
3. Natural Crochet for Babies and Toddlers by Tina Barrett (belongs to my friend)
4. The Happy Hooker by Debbie Stoller
5. 100 Crochet Projects by Jean Leinhauser and Rita Weiss
6. Crochet Bible by Sue Whiting ( also belongs to my friend)
7.  Positively Crochet by Mary Jane Hall
8. Russian books called Crocheting for the whole family (Вяжем крючком для всей семьи)

I hope some of these can be of help to you also.

About MiaBabyCrochet

I have always enjoyed crocheting and I made a few things for myself when I was in school, but it really became a passion later when I got pregnant. Creating cute tiny things for the new little life inside me was not just a relaxing activity in front of the telly each evening after work, but it also helped me to connect with this tiny creature inside me, each time I made something special and unique for her. She is the sole inspiration for all my works and this blog is dedicated to her.